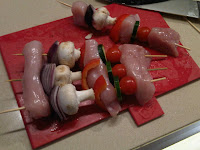
The idea for this came from a 'winter barbecue'; a summer al-fresco one seems so far away. So by making this in mid January, you can have all the flavours and ingredients you'd eat in abundance in the summer months while it's actually dark and cold outside. It's basically just some chicken and vegetables on skewers served with couscous, salad and pitta breads. The kebabs are made with a technique from Jamie Oliver, instead of cutting the chicken into pieces and then threading them onto skewers, you put 4 skewers through a chicken breast then cut down between them (see photo below, a picture tells 1000 words). These are so versatile, you can put any type of meat or vegetable and serve it with rice or
Ingredients -
1 to 1 1/2 chicken breasts per person
Vegetables such as cherry tomatoes, peppers, mushrooms, courgettes, onions, cut into sizeable chunks that can be threaded
Couscous (I use Ainsley Harriot's dried roasted vegetable couscous that you just add boiling water)
Brown Pitta Breads
Salad
2 skewers per person
1. Load up the skewers with the meat and vegetables, see photo for the easy way to thread the chicken.
2. Then cook or grill in a griddle pan over a medium to high heat until the chicken is cooked through.
3. Prepare the couscous to your packet's instructions and serve with your favourite salad.
4. When the chicken is cooked, remove the skewers and toast the pittas in the griddle pan for a few minutes on each side.
Sunday, 30 January 2011
Saturday, 29 January 2011
Mexican Lasagne with Guacamole (From Nigella Kitchen)
Note that this photo doesn't at all match up to the one in Nigella's cookbook. |
Put some extra chilli in the sauce, it needed zinging up a little to be more 'mexican'.
Maybe add some cajun seasoning for more mexican flavour.
Not put the extra water in that she recommends, it made the sauce way too liquidy and it didn't bake up enough.
We served it with salad and my boyfriend had his with some guacamole which he said made it much better.
Ingredients - serves 8
For the sauce: 1 tablespoon garlic oil
1 onion, peeled and chopped
1 red pepper, de seeded and chopped
Pinch of salt
2 tablespoons coriander stalks, finely chopped
2 x 400g can chopped tomatoes, plus 400ml water swilled from empty cans (it definitely didn't need this, I'd advise you to leave it out and only add a little water if it's too thick)
1 squirt of tomato ketchup
For the filling:
2 x 400g can black beans, drained and rinsed
2 x 250g cans sweetcorn
250g mature Cheddar
Some spit roasted chicken (optional)
1 packet (8) soft tortillas
Salad and guacamole to serve.
1. Preheat the oven to 200c. Then make the sauce by heating the oil in a pan, frying the onion, pepper and chilli. Add the salt and cook gently for 15minutes, once soft add the coriander. Then add the chopped tomatoes (and water, see note above). Spoon in the ketchup and let it simmer for about 10 minutes.
2. Meanwhile, make the filling by mixing the drained beans and sweetcorn in a bowl and most of the grated cheese. (we put the chicken here too)
3. Assemble the lasagne by spooning a third of the sauce in the bottom of an ovenproof dish (approx 26cm x 6cm deep) then layer 2 tortillas so they cover the sauce overlapping slightly.
4. Then add a third of the beans and cheese mixture, covering the tortillas and then add a quarter of the remaining sauce and 2 tortillas to cover.
5. Repeat with another 1/3 of the beans and cheese and some more sauce before layering another 2 tortillas.
6. Finally. add the last layer of beans and cheese and nearly all the sauce before covering with the last 2 tortillas. Then spread the last of the sauce with the remaining cheese before baking in the oven for 30minutes. Then let it rest for about 10 minutes before slicing and eating with the salad and guacamole.
- Nigella also notes that this can be made 1 day ahead and refrigerated until needed but with an extra 5 minutes cooking time. You can also freeze it for up to 3 months by wrapping the dish in a double layer of clingfilm and a layer of foil. Then defrost in the fridge overnight and cook as above.
Thursday, 27 January 2011
Chocolate Rice Krispie Cakes
I haven't made or seen rice krispie cakes for years; maybe because I haven't been a child for years. They're not the most elegant of cakes and certainly don't compared to macaroons or decorated cupcakes but I like them because they're just so simple. You don't even have to turn your oven on, just melt some chocolate, butter and syrup and stir in the puffed rice and BAM, you've got a tray of afternoon treats. And of course they're nostalgic, everybody's eaten these at kid's birthday parties.
These are also good for Easter, you can use cornflakes or shredded wheat instead of the krispie's and put a little chick or some coloured mini eggs on top.
I almost feel silly putting a recipe up (do these count as baking if they take 10 minutes and you don't cook them?!), but for the love of the humble krispie cake, here goes:
Ingredients -
50g butter
100g dark chocolate
2 1/2 tbsp golden syrup
120 g rice krispies or 80g cornflakes
1. Melt the butter, chocolate and syrup in a pan on a low heat.
2. Once melted, add the cereal and stir to coat evenly.
3. Spoon the mixture into paper cases and refrigerate until set.
- and if you're not a regular reader of my blog, please stay tuned and I'll promise to post a 'proper' recipe in the next couple of days! :)
Tuesday, 25 January 2011
Chilli con carne
Chilli is a great Mexican family dinner and tastes great served with brown rice and grated cheese, although my brother loves his in taco shells. In this recipe, you can add a small (about the size of a thumb) piece of dark chocolate instead of the sugar which adds more depth. And I often freeze chilli and defrost about a day before cooking. Just put it in a freezer bag and it will last for a couple of months for a quick midweek dinner!
Ingredients -
1 tbsp oil
1 large onion, diced
1 red pepper (optional)
2 garlic cloves, peeled
1 heaped tsp hot chilli powder
1 tsp paprika
1 tsp ground cumin
500g lean minced beef
1 beef stock cube
400g can chopped tomatoes
1/2tsp dried marjoram
1 tsp sugar
2 tbsp tomato puree
1 or 2 cans of red kidney beans
Cheese, rice, taco shells and sour cream to serve.
1. Heat some oil in a pan and fry the onions until soft. Add the garlic, red pepper, chilli, paprika and cumin. Stir and cook for 5 minutes.
2. Brown the mince on a high heat. Once fully browned, crumble a stock cube into the mix. Then add a can of chopped tomatoes and the marjoram and sugar, salt and pepper. Then squirt some tomato puree and stir.
3. Simmer gently, bring it to the boil and put a lid on the pan. Turn down the heat until bubbling and leave for around 20minutes. If it needs loosening up, add up to 1/2 pint of hot water. Then add the drained kidney beans and bubble in the sauce. Season again if it needs it.
4. Leave to cool and refrigerate if leaving it for the next day or leave on the hob if serving later that day. Reheat until boiling and serve with rice.
Saturday, 22 January 2011
Double dessert part 2 - Swiss Meringues
This is part 2 of the double desserts using the left over egg whites from the Crème Brûlées. These meringues are made from a recipe in Eric Lanlard's 'Home Bake' cookbook and look like the ones often seen piled up in the windows of patisseries. I don't think mine quite match up to that standard but they taste good, nonetheless! And people are always so impressed if you make meringues rather than buy them. I swirled the mixture with melted chocolate before to give a marbled look and also drizzled melted chocolate over the top. These would be delicious with some ice cream and fresh fruit like raspberries or strawberries. Or you could crush up to make an Eton-mess by mixing them with whipped cream and fresh fruit.
Also, if you haven't made meringues before then here are some tips:
- Make sure your bowl and whisk are scrupulously clean and free from any grease/traces of fat. I do this by scalding them in boiling water.
- Don't over or under whisk your egg whites. If they are under whisked and not 'peaky' enough, they haven't incorporated enough air so will sink. But if you over whisk, they will go flat too. So that's why folding in the last 1/2 of the sugar is good to avoid the over beating.
- Finish making the meringues quickly and put them in the oven almost straight away.
- When cooked and ready to lift off the baking sheets, use a flat palette knife to get right underneath and carefully prise up.
Ingredients -
4 egg whites
225g caster sugar
1. Preheat the oven to 100c and line 2 baking sheets.
2. In a large bowl, using an electric hand whisk, whisk the egg whites to soft peaks. Whisk half the sugar, 1 tbsp at a time into the mixture until stiff. Carefully fold in the rest of the sugar using a large metal spoon.
3. Carefully drop spoonfuls of the mixture spaced well apart, onto the paper. Bake in the oven for about 1 1/2 hours until dry and the meringues can be lifted easily from the paper. Leave to cool in the oven with the door ajar.
Extras:
Raspberry swirl meringues - Mix 2 teaspoons framboise, 2 -3 drops raspberry extract and a small knife point of food colouring paste. Mix well and then swirl through the finished meringue mixture just before baking.
Chocolate swirl - Melt 100g dark chocolate and swirl with a wooden spoon through the mixture just before baking and drizzle some on top.
Caramel - Use Golden caster sugar instead for a caramel taste.
Double dessert part 1 - Crème Brûlée
This recipe only uses egg yolks so you'll be left with 4 (or 8 if you double the mixture like I did) egg whites. So I made some meringues with the left over whites. Make sure you keep them and look at my next post - double dessert part 2 for how to use them for another pudding - waste not, want not!
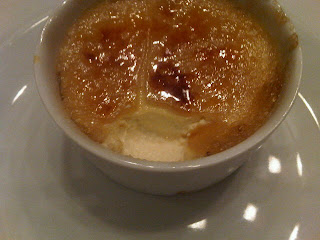
Crème Brûlée is also known as 'burnt cream', a rich vanilla flavoured custard base topped with a layer of crunchy, hard sugar top. It's something I've always loved as a pudding at restaurants but never thought about making at home before. But then I was looking through one of my Mum's French cookbooks and was inspired by a recipe for it. I love the sound as you tap the sugar crust with a spoon and then piercing through to the soft custard.
The original french recipe doesn't put the custard in the oven so it would be very runny, so I combined it with a recipe that did use a bain marie and it seemed to set it well.
- The recipe that I used said to use demerara sugar but this was a disaster, it didn't caramelise or go hard. So after about an hour, I scraped this off and put caster sugar on and used a hotter flame until it really bubbled and sure enough, you could tap the top :D a perfect Crème Brûlée!
- Also, if you have a real vanilla pod, I'd recommend it as the extract just wasn't strong enough.
Ingredients - (serves 4)
600ml single cream
4 large egg yolks
2 level teaspoons cornflour
2 tablespoons caster sugar
2 teaspoons vanilla extract or the seeds of a vanilla pod.
2-3 tablespoons caster sugar
1. Preheat the oven to 150c. Place the cream in a small heavy-based pan and cook over a low heat until warm, don't let it boil though.
2. Have a pan of simmering water ready. In a large bowl place the egg yolks and add the cornflour and sugar and beat together with a wire whisk to break down any lumps. Gradually stir in the warm cream.
3. Then place the bowl over the simmering water and stirring continuously, cook until the mixture thickens slightly (it takes about 10 minutes)
4. Then remove from the heat and stir in the vanilla essence. Pour the mixture into 4 ramekin dishes, until about 3/4 full. Then put the ramekins in a large roasting tin and fill the roasting tin with water until the water comes half way up the outside of the ramekins (a bain-marie) and place in the oven and bake for about 30-40minutes until the custards are set but still have a good wobble.
5. Then remove the ramekins from the water (it can be tricky, I used oven gloves and quickly moved them onto a cooling rack) and cool. Then keep them in the fridge until you're ready to serve. I'm leaving mine overnight.
6. 1-2 hours before serving, sprinkle the surface of each custard with the caster sugar and either caramelise with a chef's blowtorch (make sure it has a really concentrated hot flame) or place under a very hot grill for a few minutes. Then refrigerate again for 1-2 hours and serve!
Tuesday, 18 January 2011
Velvet Salted Caramel Chocolate Torte
This is such a heavenly pudding, it's a gooey chocolate fallen souffle with 'THE' flavour de l'annee, salted caramel. The recipe is from Green & Black's Ultimate Chocolate cookbook that I was given as a Christmas present. It was hard to choose a pudding to make at the weekend as everything in the book looked so good! But my Grandpa loves caramel and I'd never attempted it before so I chose this one. The contributor of the recipe said that 'there must be something in the alchemy of salt, deep caramel and darkest chocolate. Something highly addictive I'd warrant, a truly divine pudding' and I couldn't agree more. Before I tried salted caramel, I didn't really see what all the fuss was about yet it was appearing everywhere. I'm not really a fan of salt, always feeling really thirsty after I have it and knowing that it raises your blood pressure. But when I tasted salted caramel, I suddenly understood why everyone goes crazy for it. And of course, it's a miniscule amount of salt so you don't have to worry, yet it cuts through the sweet caramel and enhances its flavour.
You should make this pudding a few hours before you want to serve it as it needs time to cook and then cool and you serve it at room temperature, although I think it would be even better warm (but be careful that the caramel isn't scalding hot). As I said, it was my first attempt at making caramel and I was a bit worried when reading that you should keep a bowl of ice cold water nearby. But it was fine, just keep it in a deep pan at arm's length and stand back when adding the cream. Also keep watching it like a hawk so that it doesn't burn, it changes very quickly and if a tiny bit gets burnt, it will taint and bitter the whole batch so you'd have to start over again.
The pudding is perfect for a dinner party but I had some trouble when serving it, it looked great but it collapsed when serving into bowls. I served it with some Carte D'or vanilla ice cream.
Ingredients -
For the caramel:
175g golden caster sugar
3 tablespoons water
120ml double cram
1/2 tsp sea salt flakes
120g unsalted butter, cubed
For the torte:
250g dark chocolate, broken into pieces
160g unsalted butter, cubed
175g golden caster sugar
1 tsp vanilla extract
120g ground almonds
5 medium egg yolks
6 large egg whites
Cream or good vanilla ice cream to serve (I don't think you can beat Carte D'or)
1. Make the salted caramel by pouring the sugar into a heavy based pan and add the water. Heat gently, stirring only until the sugar dissolves. Then turn the heat up to medium high and allow the syrup to come to the boil undisturbed. Simmer briskly and watch like a hawk until the caramel turns a rich amber colour (mine took a little longer than I expected but don't let it burn or you'll have to start all over again) Swirl the pan to prevent hot spots but don't stir or the caramel will clump and crystallise. Remove the pan from the heat and carefully stir in the cream and salt (be careful and stand back) then stir in the butter cubes until a smooth caramel forms. Set aside to cool.
2. Then preheat the oven to 180c and line a 23cm springform cake tin with baking parchment.
3. Melt the chocolate, butter and sugar together - either with a heatproof bow over boiling water or do what I did and put it in the microwave on low, stirring and heating until all dissolved. Remove from the heat and stir until smooth then mix the vanilla and almonds, followed by the egg yolks, one by one.4. Whisk the egg whites in a clean bowl until they form stiff peaks. Fold 1 large tablespoon into the chocolate mixture with a metal spoon or spatula and then fold in the rest, trying to retain as much air as possible. Scrape about 2/3 batter into the tin, then make a dip in the centre and spoon the caramel into the dip. Then top with the rest of the chocolate, smoothing to the edges.
5. Bake for about 30-40minutes until puffed and barely firm. Leave to cool completely in the tin, it will crumple in the centre. Slice and serve at room temperature with ice cream.
NB - When I cut into the cake, caramel came running out so make sure you have it over a big surface so you can scoop it all up!
The Caramel started leaking out! |
Saturday, 15 January 2011
Jamie's Sea Bass & Crispy Pancetta, Sweet Potato Mash and Asian Greens...
This is another recipe from Jamie's 30minute meals cookbook that I cooked with my boyfriend last night. I think it's a really great way to do the sweet potatoes with coriander and mango chutney. It's kind of an Asian mix with some Italian Pancetta. Unfortunately Sainsbury's had run out of Seabass so we had to do the recipe with Haddock, which was nice but Seabass would have definitely been better. I also didn't have any asparagus for the greens so used spinach with the broccoli instead. And because we didn't make the lemon and ginger drink or berry ice cream like Jamie does in the 30minute recipe, ours was ready a lot sooner. I cut down the amount of lemon, salt and olive oil that Jamie ALWAYS insists on. I think these top chefs seem to have lost their taste buds and can only eat anything coated in lemon, salt and oil -raising your blood pressure and adding unnecessary calories.
Ingredients - (based on the recipe for 4 people)
For the Mash:
700g sweet potatoes,
2 limes,
A small bunch of fresh coriander,
2 tablespoons mango chutney,
Soy Sauce.
For the Greens:
1 fresh red chilli
1 clove of garlic
Soy Sauce
1 lime
Sesame Oil
100g Asparagus or some spinach
1 head of broccoli
For the Seabass:
8 thin slices of pancetta
4 x 150g fillets of sea bass, skin on, scaled and pin-boned
1 lemon (if you feel it's necessary)
1 tsp fennel seeds (optional)
1. Wash the sweet potatoes, trim off any gnarly bits then stab them a few times with a knife. Put in a large microwave safe bowl, halve one of the limes and add to the bowl then cover with a double layer of clingfilm and microwave on full power for 12 minutes, or until cooked through.
2. Deseed and finely chop the chilli adding half to a large serving bowl and set the rest aside. Crush the unpeeled clove of garlic into the bowl and add 2 tbsp of soy sauce. Squeeze in the juice of 1 lime and add a splash of sesame oil. Mix. Trim the asparagus stalks, if using, quarter the broccoli.
3. Put the pancetta into a frying pan with a drizzle of olive oil. Turn when crispy. When golden, remove to a plate and leave the fat in the pan. Add the fish to the pan, skin side down. Shake the pan and press the fish flat for a couple of seconds. Then put the fennel seeds in if using with some pepper.
4. Finely chop coriander on a large wooden chopping board, setting a few leaves aside for the garnish. Add the mango chutney, a good splash of soy and the reserved chopped chilli. Chop the mix everything together on the board.
5. Fill a large saucepan with boiling water and add the broccoli and asparagus, completely submerging them. Put the lid on and turn the heat up high.
6. Check the fish, once the skin is golden and crispy, turn the heat down to low but have confidence to let the skin become good and crispy before reducing the heat.
7. Get the sweet potatoes out of the micrwoave and check they are cooked through, then use tongs to squeeze the juice from the lime. Then carefully tip the sweet potatoes on top of the mango chutney mixture and use a knife or masher to chop and mash everything together (inc skins). Season to taste.
8. Take the pan of fish off the heat and flip the fillets over so they gently finish cooking on the flesh side. Return the pancetta to warm through and serve the fish and pancetta on top of the board of mash and take to the table.
9. Drain the broccoli and asparagus in a colander then tip into the serving bowl with the dressing, quickly toss and take to the table.
Ingredients - (based on the recipe for 4 people)
For the Mash:
700g sweet potatoes,
2 limes,
A small bunch of fresh coriander,
2 tablespoons mango chutney,
Soy Sauce.
For the Greens:
1 fresh red chilli
1 clove of garlic
Soy Sauce
1 lime
Sesame Oil
100g Asparagus or some spinach
1 head of broccoli
For the Seabass:
8 thin slices of pancetta
4 x 150g fillets of sea bass, skin on, scaled and pin-boned
1 lemon (if you feel it's necessary)
1 tsp fennel seeds (optional)
1. Wash the sweet potatoes, trim off any gnarly bits then stab them a few times with a knife. Put in a large microwave safe bowl, halve one of the limes and add to the bowl then cover with a double layer of clingfilm and microwave on full power for 12 minutes, or until cooked through.
2. Deseed and finely chop the chilli adding half to a large serving bowl and set the rest aside. Crush the unpeeled clove of garlic into the bowl and add 2 tbsp of soy sauce. Squeeze in the juice of 1 lime and add a splash of sesame oil. Mix. Trim the asparagus stalks, if using, quarter the broccoli.
3. Put the pancetta into a frying pan with a drizzle of olive oil. Turn when crispy. When golden, remove to a plate and leave the fat in the pan. Add the fish to the pan, skin side down. Shake the pan and press the fish flat for a couple of seconds. Then put the fennel seeds in if using with some pepper.
4. Finely chop coriander on a large wooden chopping board, setting a few leaves aside for the garnish. Add the mango chutney, a good splash of soy and the reserved chopped chilli. Chop the mix everything together on the board.
5. Fill a large saucepan with boiling water and add the broccoli and asparagus, completely submerging them. Put the lid on and turn the heat up high.
6. Check the fish, once the skin is golden and crispy, turn the heat down to low but have confidence to let the skin become good and crispy before reducing the heat.
7. Get the sweet potatoes out of the micrwoave and check they are cooked through, then use tongs to squeeze the juice from the lime. Then carefully tip the sweet potatoes on top of the mango chutney mixture and use a knife or masher to chop and mash everything together (inc skins). Season to taste.
8. Take the pan of fish off the heat and flip the fillets over so they gently finish cooking on the flesh side. Return the pancetta to warm through and serve the fish and pancetta on top of the board of mash and take to the table.
9. Drain the broccoli and asparagus in a colander then tip into the serving bowl with the dressing, quickly toss and take to the table.
Thursday, 13 January 2011
Lasagne
Lasagne is such a great dish to make for a crowd. It's one of those things that tastes better as it matures so it's good (and handy) to make a couple of days in advance. I make it using my Dad's famous Bolognese sauce, taught to him by my Grandma when he left home. But I must admit that for the white sauce... I shamefully used Dolmio.... (only because I was pushed for time and we had some in the cupboard)... If you want to be better and more virtuous than I was, Delia has a good basic recipe for a white sauce. I always use green pasta sheets in lasagne, I think it adds another dimension along with the mushrooms. I serve it with a balsamic dressed green salad. If you drain all the fat off the mince (see recipe), it makes for a healthy dinner.
Ingredients - (makes 1 big lasagne to feed about 6 depending on the size of your dish, you'll probably have some sauce left which you could freeze or serve with some pasta the next day)
2 x 600g lean mince
1 pack closed cup mushrooms, chopped
1 large white onion, diced
3 tins tomato purée
3 tins chopped tomatoes
Good glug of red white
Salt, pepper to season
Garlic flavoured olive oil
2 garlic cloves
Sprinkling of italian mixed herbs
A few gratings of parmesan cheese
Quantity of white sauce (see Delia's recipe or if you're lazy like me, a jar of dolmio)
Lasagne dried pasta sheets - green is good
1. Fry off the onion in some garlic oil and then brown the mince. Once browned, drain away as much liquid/fat as you can down the sink. Then add the garlic and mushrooms.
2. Add the chopped tomatoes, tomato purée and wine and stir to coat all of the mince.
3. Add some herbs, lots of black pepper and a little salt then grate some parmesan cheese into the sauce.
4. Leave to simmer while stirring occasionally and leave it cooking for about 15-20mins on a low heat to thicken slightly.
5. Once all cooked and cooled (if the sauce is still warm, it will make the pasta curl) you can start to assemble the lasagne. Get a large ovenproof dish and spoon a good layer of sauce to cover the bottom, spreading out evenly. Then cover with a layer of the pasta sheets, cover with a layer of the white sauce, then put more meat sauce before topping again with pasta and the white sauce to finish. Grate some parmesan cheese over the top to crisp it up while it cooks.
6. You can now cover it with clingfilm and leave in the fridge for a couple of days. When cooking the lasagne, let it come up to temperate out of the fridge a couple of hours before and then cook for about 50 minutes in a preheated oven at 180c. It's best when the top has browned and the sauce is just bubbling up at the edges. Serve with a salad.
Sunday, 9 January 2011
Banana Loaf
If you have any mushy, overripe bananas that you're about to throw away, keep them and transform them into a banana loaf. This recipe is one that my Mum has been making for years, it's on a little yellow laminated card that my Dad got given in a gym cafe (the recipe claims to be high in fibre and banana goodness - potassium, and low in cholesterol) and it's now been passed down to me. The mushy bananas make the loaf really moist. You need a 900g/2lb/similar sized loaf tin and I've just discovered the lazy way of lining the tin - loaf liners!
Ingredients -
350g ripe bananas
200g self raising flour
1/2tsp salt
1/4 tsp bicarb of soda
50g butter
175g light soft brown sugar
2 eggs
75g raisins
- You could add some chopped walnuts.
1. Preheat the oven to 180c and grease and line the 2lb loaf tin with greaseproof paper (or just pop a liner in).
2. Peel and mash the bananas.
3. Sieve the flour with the bicarb and salt. Then beat the butter with the sugar until creamed. Lightly beat the eggs and then gradually with them in with the butter/sugar mixture. Stir in the raisins.
4. Turn the mixture into the prepared tin and level. Bake for about an hour, but the exact time will depend on your oven - make sure it is risen and golden.
5. Turn out to cool on a rack and it's best served warm!
Saturday, 8 January 2011
Chocolate Brownies....
A crunchy top with a gooey centre. |
Hot out of the oven. |
Makes 24.
Ingredients -
300g butter
300g dark chocolate (at least 70% cocoa solids, I guess if using the G&B's recipe you should use Green and Black's but I just used the stuff that I had in the cupboard)
5 large free range eggs
450g granulated sugar
1 tbsp vanilla extract
200g plain flour
1 tsp salt (omit if using slightly salted butter)
1. Preheat the oven to 180c. Line a baking tin (approx 30x24x6cm, although my tin is about 25cm square) with greaseproof paper/baking parchment.
2. Melt the butter and chocolate together, either in a heatproof bowl over a saucepan of barely simmering water or do what I did which was shove a bowl in the microwave and cook on low (600w) for a couple of minutes, stirring occasionally until all melted.
3. Beat the eggs, sugar and vanilla together in a bowl until the mix is thick and creamy, coating the back of a spoon. Once the butter and sugar have melted, remove from the heat/microwave and beat in the egg mixture.
4. Sift the flour and salt (if using) in to the mix and continue to beat until smooth.
5. Pour into the baking tin ensuring evenly distributed. Bake in the oven for 20-25minutes or until the whole of the top has formed a light brown crust that has started to crack. The brownie shouldn't wobble but should remain gooey on the inside.
Leave to cool for about 20minutes before cutting into large squares while still in the tin.
Tuesday, 4 January 2011
Grilled Salmon with noodles and stir-fried vegetables.
January is all about healthy healthy healthy. Foods that are fresh and help you get some vitality back after Christmas. But it's not just about nibbling on lettuce leaves. I like to make healthy food taste delicious and one of my favourites is salmon with stir-fried vegetables and noodles. Usually it's some of the healthiest foods that are the simplest and quickest meals to cook - fish and vegetables don't take long at all.
Ingredients -
Salmon fillets (1 per person)
Soy
Rice wine vinegar
Ground black Pepper
Ginger
Oil - Groundnut, sesame, garlic or chilli oil.
Noodles (either wholemeal/buckwheat or fresh egg - but if using fresh egg check the calories, some have a ridiculous amount of oil. I find M&S and Waitrose much better than Sainsbury's for being less calorific)
Stir-fry pack or any vegetables you wish to chop and add.
Sweet chilli sauce to serve.
1. Marinade the salmon fillets for as long as you can. You can do this in their packaging if it permits. I just rub some soy sauce, Japanese rice wine vinegar in and then add some of the ground black pepper and ginger and rub a tiny bit of oil on each of the fillets before putting into a hot pan. Flip it over a couple of times as it cooks.
2. Meanwhile, quickly cook the vegetables and cook the noodles as per the packet's instructions. Add a splash of water to the wok to help steam the veg and cook it quickly.
3. When the salmon is cooked to your liking, serve on top of a bed of the noodles and vegetables and drizzle with chilli sauce.
- You could also use tuna steaks for this or chicken or prawns.
Subscribe to:
Posts (Atom)