Hello my lovely readers! So sorry I haven't posted for over a month now! But I've been extremely busy studying for my final A-level exams which take place in June. So I've still got a couple of months to go and then I'll be back in cooking every single day! In the mean time I'll try and blog a few posts and some photos.
Here are some photos of some foodie bits in the past month which I will write about in due course, my Birthday at the Ivy, Easter treats and the start of summer BBQs. And I've also got some new cookbooks - Ottolenghi, The Hummingbird Bakery's new Cake Days and these will feature too :) Have a nice Easter.
Tuesday, 19 April 2011
Tuesday, 8 March 2011
Moroccan meatballs with couscous
Ingredients - serves 4/5
1 kg lean minced lamb
1 red onion, grated or finely chopped
2 garlic cloves, crushed
2 cm chunk ginger, grated or use a couple of tsp ground ginger
pinch dried chilli flakes
4 tsp ground cumin
2 tsp ground cinnamon
Olive oil flavoured with garlic
2 x 400g tins plum tomatoes (and swill half again in water)
200ml chicken stock
coriander, chopped
To serve -
400g couscous
500ml chicken stock/water
coriander
harissa paste
Pitta breads (I like the round little ones from Waitrose)1. Put the lamb, onion, garlic and half the spices in a bowl and season well. Use your hands to mulch it all up and form small meatballs (we made 40)
2. Heat garlic oil in a large pan and add the meatballs in batches, frying until browned all over. Then scoop them out. Add the rest of the spices to the pan and cook for a couple of minutes. Then add the tomatoes, stock and season. Simmer for 10 minutes then add the meatballs and cook for another 20 minutes.3. Make the couscous by adding the stock, a couple of teaspoons of harissa paste before forking through. Leave to absorb the liquid.
4. Meanwhile, grill the pitta breads by sprinkling with water then placing under a hot grill for a couple of minutes.
5. Add coriander to the meatballs and fork some through the couscous. Serve by pouring some meatballs and sauce over the couscous and mopping it up with the pittas.
- My Dad likes it with a kick so added more harissa paste.
Sunday, 6 March 2011
Mexican Fajitas
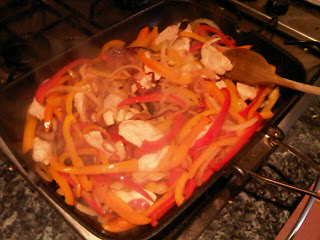
I love the whole tex-mex fajita thing. Last night I made these fajitas with my boyfriend - sizzling chicken, peppers and onion cooked in a griddle pan and then rolled up in a soft tortilla with salsa, guacamole, lettuce and grated cheese. We cheat, just the tiniest bit, by using Discovery seasoning paste but they're really yummy.
Ingredients -
Chicken breasts, cut into strips
Red yellow and orange peppers, cut into strips
Red and white onion, cut into strips
Discovery Fajita Seasoning Paste
Tortilla wraps
Salsa
Guacamole
Grated cheese
Lettuce
1. Fry the chicken, peppers and onions until really well cooked and the onions are almost caramelised. Then add the fajita seasoning paste and stir in.
2. Microwave the tortilla wraps to warm and soften.
Saturday, 5 March 2011
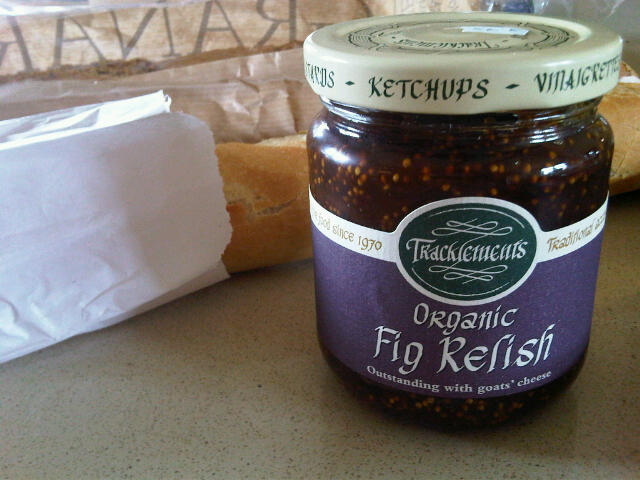
Fig relish, Parma ham, rocket and cheese baguette...
I don't usually bother making gourmet lunches, normally just getting some soup or a peanut butter sandwich. But today was different as I saw an idea for this baguette -
Salty ham with sweet figs and peppery rocket combine to make a great sandwich. I went to my local deli to buy the fig relish and some good ham (prosciutto or parma). I then bought some fresh baguettes, a few slices of good Cheddar (although brie or goats cheese would also work) and a bag of rocket. Assemble by spreading a thin layer of the relish before layering the ham, cheese and rocket with a grinding of black pepper.

Salty ham with sweet figs and peppery rocket combine to make a great sandwich. I went to my local deli to buy the fig relish and some good ham (prosciutto or parma). I then bought some fresh baguettes, a few slices of good Cheddar (although brie or goats cheese would also work) and a bag of rocket. Assemble by spreading a thin layer of the relish before layering the ham, cheese and rocket with a grinding of black pepper.

Chocolate Chip Cookies
These cookies are really good, soft yet chewy with just enough chocolate and a hint of vanilla. They're even better warm served with ice cream.
Ingredients-
250g plain flour
Half tsp bicarbonate of soda
Half tsp salt
170g unsalted butter, melted
200g soft brown sugar
100g caster sugar
1 tbsp vanilla extract
1 egg plus 1 egg yolk
325g chocolate chips
1. Preheat the oven to 170c and grease a couple of baking trays or line with baking paper.
2. In a bowl, cream together the butter and sugars until well blended then add the vanilla and eggs until combined. Sift the flour and bicarbonate until just blended, then add the chocolate chips.
3. Drop cookie dough onto the baking trays with each cookie about a tablespoon. Don't flatten, leave a big gap between them.
4. Bake for about 14 minutes or until the edges are lightly toasted. Cool for a few minutes on the baking sheets then transfer to wire racks.
Ingredients- 250g plain flour
Half tsp bicarbonate of soda
Half tsp salt
170g unsalted butter, melted
200g soft brown sugar
100g caster sugar
1 tbsp vanilla extract
1 egg plus 1 egg yolk
325g chocolate chips1. Preheat the oven to 170c and grease a couple of baking trays or line with baking paper.
2. In a bowl, cream together the butter and sugars until well blended then add the vanilla and eggs until combined. Sift the flour and bicarbonate until just blended, then add the chocolate chips.
3. Drop cookie dough onto the baking trays with each cookie about a tablespoon. Don't flatten, leave a big gap between them. 4. Bake for about 14 minutes or until the edges are lightly toasted. Cool for a few minutes on the baking sheets then transfer to wire racks.
Saturday, 26 February 2011
Cake Pops!
Cake Pops/Cake Balls/Cake Popsicles - After seeing these on the internet (Bakerella, of course, is the original cake pop queen) and in magazines, I have decided to give them a go! If you haven't seen them, then cake pops are basically balls of crushed up cake mixed with frosting, dipped into chocolate on sticks and decorated with various glittery colourful decorations. I'm making them this weekend as a trial run as for my birthday (in a couple of weeks time), instead of my usual cupcakes, I'm going to make cake pops and decorate them with flowers and have them standing out of a flower pot!
You can make cake pops out of fresh cake but they tend to work better with day-old cake that's a bit drier - a good way of using up leftover cake. I'm being lazy and using Betty Crocker devils food mix and Betty Crocker Chocolate cake frosting but you could make a homemade cake and frosting. If you don't have lollipop sticks to stand them up, then you can just make them as 'cake balls' that look like truffles.
Ingredients -
Chocolate cake (made from a mix like Betty Crocker or handmade)
Chocolate frosting (you can either make a buttercream or use Betty Crocker's chocolate frosting)
Chocolate Scotbloc to melt
Lollipop sticks
Decorations/Sprinkles
1. Make the cake according to the packet's instructions. With B.C mix, you just add 3 eggs, oil and water and mix it. Bake in the oven. Leave to cool completely.
2. In a bowl, fork the cake into crumble it into tiny pieces. Then stir in part of the frosting (a little at a time until it turns into a paste, you don't want them to be too sticky) and mulch up with your hands. When all combined, shape into about 2inch balls and place on a tray.

3. Chill the balls for at least 30minutes in a fridge.
4. Then melt the chocolate/scotbloc in a microwavable bowl on a low heat. When all melted, dip a lollipop stick into the chocolate and then push into one of the balls, this will act as a glue. Leave to set.
5. When the stick is secured in the ball, dip a ball in the chocolate and cover with a spoon. When covered, gently spin or tap until the excess drops off (don't do it too hard or the ball will split or fall off). Then decorate with sprinkles or flowers while the chocolate is still wet. Stand up to dry (some chocolate may drip off a little bit). Leave to set, ideally in a fridge or a freezer if you can fit them in. - see tip below.
6. Then either give them as a gift wrapped in cellophane and a ribbon. Or serve at a party! I'm going to have mine coming out of a flower pot, standing in an oasis block to look like flowers.
- Some extra advice - It's really difficult to use normal chocolate to cover the cake balls as it doesn't set quick enough. My Mum came up with the idea of using Scotbloc which sets much quicker and gives a glossy finish. I think this is the UK equivalent of 'treebark chocolate' which is in all of their pop recipes. Happy Baking :)
You can make cake pops out of fresh cake but they tend to work better with day-old cake that's a bit drier - a good way of using up leftover cake. I'm being lazy and using Betty Crocker devils food mix and Betty Crocker Chocolate cake frosting but you could make a homemade cake and frosting. If you don't have lollipop sticks to stand them up, then you can just make them as 'cake balls' that look like truffles.
Ingredients -
Chocolate cake (made from a mix like Betty Crocker or handmade)
Chocolate frosting (you can either make a buttercream or use Betty Crocker's chocolate frosting)Chocolate Scotbloc to melt
Lollipop sticks
Decorations/Sprinkles
1. Make the cake according to the packet's instructions. With B.C mix, you just add 3 eggs, oil and water and mix it. Bake in the oven. Leave to cool completely.2. In a bowl, fork the cake into crumble it into tiny pieces. Then stir in part of the frosting (a little at a time until it turns into a paste, you don't want them to be too sticky) and mulch up with your hands. When all combined, shape into about 2inch balls and place on a tray.

3. Chill the balls for at least 30minutes in a fridge.
4. Then melt the chocolate/scotbloc in a microwavable bowl on a low heat. When all melted, dip a lollipop stick into the chocolate and then push into one of the balls, this will act as a glue. Leave to set.
5. When the stick is secured in the ball, dip a ball in the chocolate and cover with a spoon. When covered, gently spin or tap until the excess drops off (don't do it too hard or the ball will split or fall off). Then decorate with sprinkles or flowers while the chocolate is still wet. Stand up to dry (some chocolate may drip off a little bit). Leave to set, ideally in a fridge or a freezer if you can fit them in. - see tip below.
6. Then either give them as a gift wrapped in cellophane and a ribbon. Or serve at a party! I'm going to have mine coming out of a flower pot, standing in an oasis block to look like flowers. - Note that as these are a trial run, I haven't got a proper picture of them all standing up. I'll post one from my party in a couple of weeks time!
- Some extra advice - It's really difficult to use normal chocolate to cover the cake balls as it doesn't set quick enough. My Mum came up with the idea of using Scotbloc which sets much quicker and gives a glossy finish. I think this is the UK equivalent of 'treebark chocolate' which is in all of their pop recipes. Happy Baking :)
- I wrapped a cake ball up and gave it to my friend for her birthday.
Sunday, 20 February 2011
Best Ever Chocolate Brownies -
Since Costco has stopped selling my favourite brownie mix (see previous post), I have been on the hunt for a new favourite. I tried the recipe from the Green and Black's cookbook which was really good but I'd heard so many good things (thanks to 'Lazylol' who commented on the G&B brownies) about a recipe from BBC Good Food which claimed to be the 'best ever'. So on this rainy depressing Saturday in February, I tried it out. Obviously it's been a few weeks since the Green and Black's brownies so it's hard to make a direct comparison but I think these may just have the edge.
These brownies are made slightly differently to the usual method. I usually just melt the chocolate/butter and then mix everything together with a wooden spoon. But these require a little more attention, whisking the eggs and sugar together with an electric mixer and then sifting the flour, folding the chocolate etc. But they are worth the wait. However, they should come with a warning, they're extremely rich. With other brownie mixes, I could, if left to my own devices, probably eat rather a lot before feeling a bit sick and sugar-rushey. But with these, I had a headache after just a small square! I think it's the large amount of dark chocolate with a lot of cocoa and then having chocolate chunks in the mix too. But they were definitely a hit with the rest of the family. They have a great crispy top with such a fudgey centre, yet they were firm enough to cut and serve (a fault with the old costco mix, you literally had to eat it with a spoon from the tin). I like my brownies to be almost under baked, but if you want yours a bit more cakey then leave them in the oven for a bit longer.
Also, before I post the recipe, a little tip on lining the tin. My boyfriend lined the tin today and he made a really cool net of baking paper with slits in the corners so it could easily lift out of the tin (see the photo for a better understanding). He did it by having the paper overlapping each side of the tin by about 2 inches, then fold all of the edges in evenly to make a square the size of the tin then unfold and cut every other slit.
The recipe - I've really condensed this recipe as the one on the BBC good food site is so ridiculously over complicated that it's confusing! I mean, it's a brownie mix for god's sake! So I've made it simple:
Ingredients -
185g unsalted butter
185g dark chocolate (I used half Sainsbury's cooking chocolate and half G&B 70%)
85g plain flour
40g cocoa powder
50g white chocolate, chopped into small chunks
50g milk chocolate, chopped into small chunks
3 large eggs
275g golden caster sugar
1. Preheat the oven to 160c (fan oven). Line a tin with baking paper.
2. Put the butter and dark chocolate into a microwavable bowl and melt on a low heat for a minute before stirring, then if not fully melted, continue. Leave to cool to room-temperature.
3. Meanwhile, chop the white and milk chocolate into chunks. Then break the eggs into a bowl and tip in the sugar. Using an electric mixer on the maximum speed, whisk until the eggs look thick and creamy and have nearly doubled in size.
4. Then pour the chocolate mix over the egg mix and gently fold with a spatula until the 2 mixtures combine. Try not to knock out too much of the air.
5. Then sift the cocoa and flour mixture into the chocolate/eggs and fold in gently until all incorporated. Don't over fold. Then stir in the chocolate chunks and pour into the tin. Place in the middle of the oven and cook for about 25-35 minutes. This will depend on your oven, I usually put a timer on for 18 minutes and then check it every couple of minutes after. I use a skewer to test if it is ready. You want it to still have a slight wobble and a tiny bit of chocolate still on the skewer as it will continue cooking for a few minutes after coming out of the oven. It should have a shiny, papery crust with the sides just beginning to come away from the tin.
6. Leave the brownie in the tin to cool and then lift the baking paper up to get the whole brownie out to serve. I cut it into 4 x 4 squares, but you could easily cut these in half again due to their richness. Keep in an airtight tin.
These brownies are made slightly differently to the usual method. I usually just melt the chocolate/butter and then mix everything together with a wooden spoon. But these require a little more attention, whisking the eggs and sugar together with an electric mixer and then sifting the flour, folding the chocolate etc. But they are worth the wait. However, they should come with a warning, they're extremely rich. With other brownie mixes, I could, if left to my own devices, probably eat rather a lot before feeling a bit sick and sugar-rushey. But with these, I had a headache after just a small square! I think it's the large amount of dark chocolate with a lot of cocoa and then having chocolate chunks in the mix too. But they were definitely a hit with the rest of the family. They have a great crispy top with such a fudgey centre, yet they were firm enough to cut and serve (a fault with the old costco mix, you literally had to eat it with a spoon from the tin). I like my brownies to be almost under baked, but if you want yours a bit more cakey then leave them in the oven for a bit longer.
Also, before I post the recipe, a little tip on lining the tin. My boyfriend lined the tin today and he made a really cool net of baking paper with slits in the corners so it could easily lift out of the tin (see the photo for a better understanding). He did it by having the paper overlapping each side of the tin by about 2 inches, then fold all of the edges in evenly to make a square the size of the tin then unfold and cut every other slit.
The recipe - I've really condensed this recipe as the one on the BBC good food site is so ridiculously over complicated that it's confusing! I mean, it's a brownie mix for god's sake! So I've made it simple:Ingredients -
185g unsalted butter
185g dark chocolate (I used half Sainsbury's cooking chocolate and half G&B 70%)
85g plain flour
40g cocoa powder
50g white chocolate, chopped into small chunks
50g milk chocolate, chopped into small chunks
3 large eggs
275g golden caster sugar
1. Preheat the oven to 160c (fan oven). Line a tin with baking paper. 2. Put the butter and dark chocolate into a microwavable bowl and melt on a low heat for a minute before stirring, then if not fully melted, continue. Leave to cool to room-temperature.
3. Meanwhile, chop the white and milk chocolate into chunks. Then break the eggs into a bowl and tip in the sugar. Using an electric mixer on the maximum speed, whisk until the eggs look thick and creamy and have nearly doubled in size.
4. Then pour the chocolate mix over the egg mix and gently fold with a spatula until the 2 mixtures combine. Try not to knock out too much of the air.
5. Then sift the cocoa and flour mixture into the chocolate/eggs and fold in gently until all incorporated. Don't over fold. Then stir in the chocolate chunks and pour into the tin. Place in the middle of the oven and cook for about 25-35 minutes. This will depend on your oven, I usually put a timer on for 18 minutes and then check it every couple of minutes after. I use a skewer to test if it is ready. You want it to still have a slight wobble and a tiny bit of chocolate still on the skewer as it will continue cooking for a few minutes after coming out of the oven. It should have a shiny, papery crust with the sides just beginning to come away from the tin.
6. Leave the brownie in the tin to cool and then lift the baking paper up to get the whole brownie out to serve. I cut it into 4 x 4 squares, but you could easily cut these in half again due to their richness. Keep in an airtight tin.
Subscribe to:
Posts (Atom)